Growing Cover Crops in Your Home Garden

A few weeks ago I had the opportunity to teach a class at our own Portland Nursery on Growing Cover Crops in the Home Garden.  The turnout was impressive and it made me realize that there is more and more excitement and interest in this important organic gardening practice, so its time for a blog!!

When the first fall rains come here in Portland, and all the tomatoes turn to mush on the vine, it can often feel like the growing season is emphatically over.  If you haven't planned ahead and planted a winter garden, the growing season is indeed drawing to a rapid close.  But even if you won't be harvesting from your garden in the rainy season, there are a variety of things you can do to revitalize and take care of the garden that has taken such good care of you over the season.

Growing a living "Cover Crop" is one of the best ways to take care of and replenish your garden in the winter months.  Cover Crops offer an overwhelming variety of benefits to your garden insulating, protecting, conditioning and revitalizing your precious soil!  This blog post will give you the information you need to understand, choose, plant, and maintain your own home-grown cover crop!  So lets dig right in...

Mature Cover Crop at the UC Santa Cruz Farm.  Bell Beans, Oats, and Vetch

Mature Cover Crop at the UC Santa Cruz Farm.  Bell Beans, Oats, and Vetch

What are Cover Crops?

Cover Crops, sometimes also called "green manures," are crops/plants that are grown for a variety of reasons, other than for consumption, in larger quantities (to “cover” an area) and to maintain/improve the health of the soil and garden. They are most often planted during Winter, though not exclusively.

Farmers and gardeners have taken a hint from natural ecosystems in adopting cover cropping techniques.  If you take a look at any natural environment you will see cover cropping happening naturally!!  Whether in forests, grasslands, or even in deserts, growth and ground cover will happen wherever conditions will allow.

What are the advantages/benefits of growing cover crops?

So many!!!  Some of the most important include:

  • Adding fertility to soil by capturing atmospheric nitrogen (nitrogen fixation by legumes)

  • Increasing soil organic matter and increasing soil biological activity (by growing biomass)

  • Preventing soil erosion and compaction from fall and winter precipitation (by providing ground covering)

  • Capturing and cycling nutrients (especially leachable nitrogen)

  • Improving soil structure and “tilth” by the action of roots and in the decomposition of plant material

  • Improving drainage in soil through root penetration and increase in soil organic matter

  • Suppression of weeds and conservation of moisture (by providing ground cover)

  • Increasing habitat for beneficial insects

  • Pest and disease suppression

The fibrous root systems of grasses are especially helpful in cover cropping suppressing weeds, improving drainage, and conditioning soils.

The fibrous root systems of grasses are especially helpful in cover cropping suppressing weeds, improving drainage, and conditioning soils.

What are the different types of Cover crops?

Most cover crops fall into one of three categories representing different important and useful plant families.

Grasses/Grains

Plants in the grass family are extremely helpful in cover cropping for a variety of reasons.  Their extensive fibrous root systems are excellent at conditioning soil, improving soil structure, and water infiltration.  Their habitat of covering ground and crowding out other plants makes them excellent for weed suppression and prevention of erosion, while their vigrous vegetative growth help increase the level of organic matter in soils.

Common Grasses/Grains used in Cover Cropping include: Rye, Wheat, Oats, Barley, Triticale,  and Sudan Grass

Legumes

The Legume family is the one plant family in the whole plant kingdom which has the ability to capture Nitrogen from the atmosphere and store it in the soil.  Legumes accomplish this through a complex cooperation with specific strains of bacteria that live on their roots.  For more info on Nitrogen Fixation check out this great article from ...  "Nitrogen Fixation" is definitely the most important contribution of Legumes, however they are also helpful in increasing soil organic matter, suppressing weeds, and providing habitat for beneficial insects

Common Legumes used in Cover Cropping include: Clovers (Crimson, Red, and White) Vetches (Common, Hairy, and Purple) Beans (Fava, Bell, Soy) and Peas (Field, Austrian Winter)

Crimson Clover is an excellent cover crop for fixing nitrogen in the soil.  It is grown widely in the Willamette Valley and the spring blooms are not to be missed!!

Crimson Clover is an excellent cover crop for fixing nitrogen in the soil.  It is grown widely in the Willamette Valley and the spring blooms are not to be missed!!

Brassica ("Cabbage" or "Mustard") Family

Certain members of the Brassica family play important roles in cover cropping.  Plants like Daikon Radish with powerful taproots are used in breaking up compaction in soils.  Other Brassicas are used in suppressing pests and diseases through the release of natural chemicals in their roots.  Because they are so deeply rooted, Brassicas also play an important role in scavenging and cycling nutrients.

Common Brassicas used in Cover Cropping include: Daikon Radish, Mustard, and Rape (Canola)

Buckwheat

Buckwheat is in a category all its own but is used extensively as a summer cover crop and so deserves mention here.  Buckwheat is a vigorous, heat loving plant which germinates and grows more quickly than most food crops and weeds.  It is often used as a quick growing cover crop in between food crops.  It is excellent for increasing soil organic matter and its precocious flowers provide incredible nectar and pollen sources for bees and other beneficial insects.

Which cover crop(s) should I use?

The first step in choosing your cover crop is to identify what your goal/goals are.   In most cases a combination of cover crops are used together (often a grass and a legume) for their complementary effects.

Sowing a mixture of cover crops is an excellent way to enjoy a range of benefits for your garden.  This mix from Johnny's Seeds contains: Clover, Rye, Peas, Oats, and Vetch

Sowing a mixture of cover crops is an excellent way to enjoy a range of benefits for your garden.  This mix from Johnny's Seeds contains: Clover, Rye, Peas, Oats, and Vetch

By matching your gardens specific needs to the benefits provided by different cover crops you will choose a combination that will best support your specific garden.

This "Cover Crop Solutions Chart" put out by Peaceful Valley Farm Supply is an excellent reference for choosing the perfect cover crop for your specific situation.

***If it is your first time ever growing a cover crop, I would suggest purchasing a cover crop mix from a local nursery.  Naomi's Organic Farm Supply and Portland Nursery both sell mixtures that include four or five different cover crops each offering different benefits for your soil. Remember to take note of the suggested seeding rate/area so you know how densely to sow your mixture!***

When Should I Plant My Cover Crop?

The timing on the planting of your cover crop will depend on which cover crop/s you choose and what you plan to do with it in the spring.  It will also depend on the weather which of course, is beyond our control.

Even given all of these variables, some general principles around planting can be followed...

A winter cover crop should be sown at such a time that it can become well established over the winter so as to do its jobs of covering soil, fixing nitrogen, suppressing weeds, etc...  A cover crop that is planted too late in the fall does not become well established and fails to offer the many benefits which it is capable of. 

On the other hand, a cover crop that is planted too early will become over mature and can become woody, and difficult to incorporate into the soil in the spring.  Additionally, if cover crops are not removed or incorporated on time they can go to seed and cause weed problems in the following season.

***In general, Winter cover crops should be sown between September 15th and November 1st.  If you are sowing a mix of seeds, October 1st-October 15th is a good planting window. ***

Image courtesy of Mother Earth News

Image courtesy of Mother Earth News

How Should I Plant My Cover Crop?

Step 1: Remove all vegetable and weed and other plant material from the area to be cover cropped.

Step 2:  Lightly till surface of soil with tilthing fork, hard rake, or garden claw.  When very small seeds are to be sown (such as clover) create a fine seed bed with minimal clods.  If larger seeds are to be sown (such as beans or peas) a coarse seedbed will suffice

Step 3: "Broadcast" or sprinkle seeds by hand following the recommended seeding rate.

Step 4: Incorporate the seeds you have sown using a chopping motion with a hard rake or hoe.

Step 5: Irrigate with an overhead sprinkler only if precipitation is not expected within a few days

Woohoo! Your done!  Cover crops are extremely self sufficient.  Winter rain will do the rest of the work, until you are called upon in the spring! Which leads us to...

Preparing a fine seedbed is especially important for small seeded cover crops like Clover

Preparing a fine seedbed is especially important for small seeded cover crops like Clover

What should I do with my cover crop in the Spring?

So you have grown yourself a cover crop...  You chose your seeds, prepared your soil, seeded the crop, and it has grown slowly but steadily throughout the winter.  If your timing for seeding was right, your cover crop is close to waist high, it's late February, and you are thinking about vegetables again!  So now what?

On most farms the answer would be, hop on the tractor and till it into the soil, chopping it into a million pieces where it would quickly begin to break down in your soil.  As gardeners, working mostly with our hands, such a task is not quite as simple.  When it comes to managing our cover crop we have a couple of choices.

Option 1: Incorporation

Using this method our task is, like the farmer on her tractor, to chop the mature cover crop into small pieces and turn it into the soil where it can decompose.  Using hand tools like garden shears, pruners, or machete,  and then turning the debris into the soil is no small task!  In a larger garden, a weed whacker or powerful mower can aid in the process and a small rototiller can help with incorporation. 

Even with the help of these tools, this method will always require a waiting period before your cover crop has broken down enough to allow planting.  This waiting period can be from 1-2 months depending on how well your cover crop has broken down, and for a gardener in the Oregon Spring, this can seem like an eternity, especially if you don't have other garden space for early plantings.

Option 2: Composting Your Cover Crop

***This is my preferred method for managing a home grown cover crop.  Especially in raised garden beds where garden space is generally at a premium.***

Using this method your cover crop is harvested, roots and all, and sent to a home compost pile.  In your home compost, it can decompose slowly where all of the nutrients and fertility that have been captured can be stored and converted back into finished compost!  This compost can be applied back to your garden the following Spring where it will offer all of the same advantages to your garden that it would have offered were it turned into the soil in the prior year. 

The great advantage of this method is that you don't have to wait for cover crops to break down before planting into your garden in the Spring.  The disadvantage is that you won't have all of the benefits of your cover crop in the year that it is planted.  However, if you make cover cropping a part of your seasonal cycle, you will always have fertile finished compost to put back into your beds in the Spring!!

A mixed cover crop maturing:  Rye, Hairy Vetch, Clover, and Field Peas are all visible here.

A mixed cover crop maturing:  Rye, Hairy Vetch, Clover, and Field Peas are all visible here.


Congratulations!  You now have all the information you need to grow your own cover crop that meets the particular needs of your garden.  So don't delay!  Head over to your favorite nursery and load up on cover crop seed.  Your garden will thank you for the care and attention you are providing and will respond generously with vegetables in the years to come.

RECAP:

What are Cover Crops?  Crops grown for purposes other than consumption, for purposes of improving/maintaining health of soil and garden

What are the advantages/benefits of growing cover crops? Many! Fixing Nitrogen, increasing organic matter, preventing erosion/compaction, scavenging/cycling nutrients, improving soil structure, Improving drainage/water infiltration, weed suppression, insect habitat, pest and disease suppression.

What are the different types of Cover crops? Grains/Grasses, Legumes, Brassicas, Buckwheat

Which cover crop(s) should I use? Depends on your specific goals.  Generally a combination of legumes/grasses are used.  See "Cover Crop Solutions Chart"

When Should I Plant My Cover Crop? Depends on cover crop(s) selected.  Generally between September 15th and November 1st for Winter cover crops.

How Should I Plant My Cover Crop? Clear vegetation, prepare seedbed, broadcast seed following seeding rate, incorporate seed, irrigate (if precipitation is absent).

What should I do with my cover crop in the Spring? Option 1: Incorporate and wait for debris to decompose before planting Option 2: Remove cover crop to compost pile, apply finished compost to garden beds, plant.

Kale and Carrots and Leeks, Oh My!: Growing Your Winter Garden... In July

BUT WHY NOW?

On these delicious summer days, with the first tomatoes blushing on the vine, zucchinis growing right before our eyes, and sweet corn just around the corner, it is difficult to imagine the dark and dreary days of winter that will also be ours.  And yet, if you want kale in December, and carrots in February, or cauliflower in April the time to plant is, well... Now.

Yes indeed, it's already time to plant the vegetables that you will harvest all winter long!

These winter months are times when most of our vegetable gardens are asleep: covered with mulch, or a winter cover crop... or weeds.  We don't think of winter as a time for vegetable gardening, and for many of us gardening from Spring through Fall is enough...

...but not for me.

Western Oregonians know all too well how long our winters can be.  The wait for the first arugula and radishes of Spring plantings can seem interminable.  And I'm here to tell you:  It doesn't have to be that way!  Many people think you need a greenhouse or cold frames or wizard magic to have a successful winter garden, but its just not true.  The truth is, there are many hardy and delicious vegetables that will grow right on through the winter, unprotected, in your garden beds.  They can be harvested snow or shine during windows from November all the way through April!!

Most Kale varieties are extremely winter hardy and can withstand temperatures in the low teens !!  Black Tuscan is pictured here.

Most Kale varieties are extremely winter hardy and can withstand temperatures in the low teens !!  Black Tuscan is pictured here.

THE WINTER VEGETABLES

Arugula, Beets, Brussels Sprouts, Cabbage, Carrots, Cauliflower, Chard, Collard Greens, Kale, Kohlrabi, Leeks, Parsley, Parsnips, Radicchio, Radishes, Rutabaga, Spinach, Sprouting Broccoli, and Turnips!

All of these vegetables can be harvested during different windows from November all the way through April.  Growing a Winter garden, doesn't have to be difficult, but as always, there are a few very important things to consider.  The most important factors in the success of your winter garden are your selection of vegetables to grow, selection of winter hardy varieties, and the seasonal timing of your planting.  Of secondary importance are things like pest protection, method and timing of your harvest, and additional frost protection for certain vegetables.

Winter gardening is fundamentally different than gardening during the rest of the year, and it is important to understand what your vegetables are expecting during their extra long path to your kitchen, so that you also know what to expect. 

The funny thing about winter gardening, is that 90% of the actual gardening happens in the Summer and Fall.  Winter is a time mostly for harvesting the vegetables that you have tended and nurtured in prior months.  Besides, who wants to spend too much time in their garden in a downpour?

Parsnips are one of the unique treats of a winter garden.  Cobham pictured here, is one of my favorite varieties.

Parsnips are one of the unique treats of a winter garden.  Cobham pictured here, is one of my favorite varieties.

WINTER GROWTH HABITS

After about the Fall Equinox (September 21st), you will notice that the growth of all plants in your garden will slow significantly.  This is due to the decreasing amount of available sunlight as well as diminishing temperatures.  From October 15th-February 15th your garden will all but have ground to a halt.  Leaves will drop, vines will wither, and your perennial plants will move into their various states of dormancy.  But not so for the all-star cast of your annual winter vegetables.  They will be slowly but surely moving into their prime!

It is this exceedingly slow winter growth that makes the timing of winter plantings so essential.  Kale, for instance, that is planted too early in the summer will have grown to maturity and likely be moving into its reproductive phase and past its prime when winter sets in.  On the other hand, kale that is planted too late in the year will still be a teenager when winter arrives and will never reach a harvestable size because of lack of available light and warmth.

Once you plant your winter vegetables, resist the urge to harvest!  Your ability to harvest these plantings is dependent on their approaching full maturity going into winter.  This serves the dual purposes of protecting them from winter frosts as well as giving you something to harvest through the winter. 

I always like to have a dedicated separate space for my winter vegetables to create some clear separation.  It also helps to have summer gardening spaces free of plants when its time to prepare garden beds for spring planting.

VARIETAL SELECTION

Once you know what vegetables you would like to grow for the winter, do a little research to identify varieties that are especially suited for winter production.  In our climate, cold and frost resistance is generally the most important quality when selecting varieties, however resistance to fungal disease is also an important quality during a long wet winter.  Do your own research, talk to local nurseries, and browse seed catalogs for special winter varieties.

I have my own favorite varieties for winter production for every vegetable listed above.  Feel free to e-mail me (ian@portlandediblegardens.com) or comment below if you have a specific question regarding varietal selection.

Many of the Savoy type cabbages are especially suited for winter growing.

Many of the Savoy type cabbages are especially suited for winter growing.

WINTER PLANTING DATES:

I cannot take up the specifics of ideal winter planting dates here, as they vary between each of the vegetables listed above, however, most vegetables intended for a winter harvest should be planted between July 15th and August 15th.  Yes, that's now!!  Notable exceptions are leeks which take many months to mature, and should be planted no later than June 1st in order to fully size up.  Also, arugula, and radishes should be closer to September 1st since they are so much quicker to mature and may otherwise bolt before winter temperatures/day length slow them down.

My strong suggestion would be to keep good notes about your planting dates for each vegetable so you can make meaningful adjustments in the years to come.

Also, check out this amazing Winter Gardening Chart put out by Territorial Seed Company regarding winter vegetable gardening.  It is a great place to start for planting dates as well as a bunch of other useful information.

Winter Gardening Chart courtesy of Territorial Seed Company

Winter Gardening Chart courtesy of Territorial Seed Company

RECAP

So you have been pulled out of your summer reverie and forced to plan ahead for the winter.  But you will be happy you did, because you are ready to plant your winter garden!

Things To Remember :

• Winter gardening is all about Summer plantings that mature in late Fall and grow little over the winter but are harvestable for many months

• Select vegetables that are well suited for winter production in your climate (see list above)

•Select varieties that are cold hardy and resistant to fungal diseases if possible

• Plant your winter garden between July 15th and August 15th (Exceptions: Leeks by June 1st, Arugula, Radishes, Spinach by September 1st

• Wait to harvest winter plantings until they reach full maturity

• Enjoy the freshest food in the universe, all winter long!

Controlling Common Garden Pests: Cabbage Loopers and Cabbage Moths

In my last post, I talked about several ways that you can prevent common garden pests from ever even arriving at your vegetable garden.  I talked about the ideas of vegetable rotation, inviting beneficial insects, and choosing the pest resistant vegetables and varieties. These measures can go a long way in managing pests. 

Even so, and even with the very best prevention practices, some number of pests are just an inevitability.  That being said, when we do find pest presence in our gardens, there are many measures that can be taken to exclude, harass, banish, and yes... eliminate these unwanted visitors.  And it can all be done without harmful and dangerous chemicals using entirely organic methods and products!

Close up of mature Cabbage Looper larvae

Close up of mature Cabbage Looper larvae

I will be posting periodically about common garden pests in the Portland area and the Willamette Valley.  Since each garden pest is unique, requiring different approaches, I will tackle them one at a time discussing how to identify them, what vegetables they most commonly affect, and how to deal with them!!!

It should be stated first, that aside from the prevention techniques I discussed in the last blog post, early identification and action are the best way to control garden pests!  This is yet another invitation for you to be a keen observer in your garden.  I truly believe that close observation and attention are the most important skills a gardener can have.


In today's post I am going to talk specifically about Cabbage Loopers.  These small green caterpillars can do serious damage to a whole range of vegetables, not just cabbages!  The name is apt however, since Cabbage Loopers are most commonly found in vegetables from the Cabbage or Brassica family.  Some of the most susceptible vegetables to Cabbage Loopers include kale, broccoli, cauliflower, bok choi, cabbage, and collard greens.  Cabbage Loopers are pale green, and have faint white stripes that run the length of their bodies.  They are called loopers for their "looping" movement (think inchworm).

HABITS

Cabbage Loopers have voracious appetites and do most of their damage by consuming leaf tissues, eating large holes in leaves, and even boring into mature cauliflower and broccoli heads.  They can also cause damage by leaving their frass or waste in enfolded leaves of cabbages and broccolis.  Loopers are generally easy to see, feeding throughout the day, and at up to an inch long, they are large as far as invertebrate garden pests are concerned. 

Cabbage Loopers going to work on leaves of collard greens

Cabbage Loopers going to work on leaves of collard greens

NATURAL PREDATORS

Several species of parasitic wasps prey on cabbage loopers, and so planting for beneficials that attract these wasps can be effective in controlling populations.  The flowering plants of the carrot family (carrots, parsley, cilantro, celery, dill, fennel...) provide excellent pollen and nectar sources for parasitic wasps, so letting these herbs and vegetables go to flower can have an indirect effect on controlling Cabbage Loopers!


Providing nectar and pollen sources for parasitic wasps is a great way to encourage the natural predators of Cabbage Loopers in your garden!

Providing nectar and pollen sources for parasitic wasps is a great way to encourage the natural predators of Cabbage Loopers in your garden!

ORGANIC CONTROLS

Once the caterpillars have hatched, they are quick to grow, and it doesn't take much time for them to cause significant damage in the garden.  For this reason, the best time to control Cabbage Loopers is early in their life cycle.  An excellent way to establish early control is to identify their tiny pale green eggs, which are often visible on the undersides of the leaves of affected vegetables.  Removing and smooshing eggs is a great first step.

Once the larva hatch and begin consuming your vegetables, other measures are often required for control.  The most effective organic product that I have found for controlling Cabbage Loopers is Bt which stands for Bacillus thuringiensisBt is a bacteria that, when consumed by Cabbage Loopers, causes severe and ultimately lethal digestive disruption.  It is completely natural, entirely safe for human contact and consumption, and does minimal damage to other beneficial insects.  There are many commercial products containing Bt, and as long as they are OMRI (Organic Materials Review Institute) certified, you can be sure that they are safe and benign for humans.

Safer Brand Caterpillar Killer (above), and Monterey B.t. (below) are two effective commercially available forms of Bt.

I hope this is helpful to those of you who have had to deal with these little devils in the past!  Cabbage Loopers can be a real pain but with early identification and a proactive approach, you should be able to keep them at a healthy distance and enjoy your cabbages, etc... as you truly should!  Happy gardening and stay tuned for my next blog post about planting your Fall and Winter vegetable gardens!!


Controlling Common Garden Pests... Organically! Part 1: Prevention

Common Garden Pests Part 1: Prevention!

It's nearly July. Summer is here, the days stretch out, our gardens are practically growing before our eyes, the sunshine is abundant, and so (it turns out) are the pests!

The arrival of these perfect growing conditions always seem to coincide with the arrival of those uninvited companions in our gardens who insist on having the very first tastes of anything we plant. And who could blame them? They often have impeccable taste. Every garden has them, in different numbers and combinations, and so it becomes not a question of if, but who, and then what to do about them.

As organic gardeners, the answer to this question should start long before the pests ever arrive! The most vibrant and healthy edible gardens are designed and planted with natural controls against would be enemies. This post will discuss several things you can do in your garden to stop pest problems before they even begin! Vegetable rotation, encouraging beneficial insects, and thoughtful crop selection are three extremely effective ways to prevent unwanted garden pests.


Crop Rotation

Crop rotation, or vegetable rotation, is the practice of planting different families of vegetables in different locations over time. The benefits of this practice extend far beyond preventing pests, also suppressing plant disease and improving soil fertility over time.

Keep records of the locations of vegetable plantings so you can create rotations in seasons to come.

Keep records of the locations of vegetable plantings so you can create rotations in seasons to come.

Most garden pests, like humans, have strong preferences when it comes to their diet and tend to predate on the same vegetables year in and year out. By avoiding planting the same vegetables in the same place each year, populations of pests that enjoyed your arugula in year one will be very unhappy to find tomatoes growing in year two. These constant changes in their environment are confusing and frustrating to pests, and lead to less pest pressure overall!


Planting for Beneficial Insects

One of the most effective ways to control pest populations in your edible garden is to create habitat for their natural predators! In general, annual vegetables are not great habitat for many of the insects that prey on garden pests, so it is only through thoughtful planning and planting of other perennials and flowers that we can create a balanced ecosystem that keeps their populations in check.

Conventional agriculture, which relies so heavily on herbicides and insecticides misses this point entirely. The broad spectrum insecticides kill both pests and beneficial insects. When pest problems do persist on conventional farms, they get out of control easily because of a lack of natural predators.

Every pest has a unique set of natural predators. It can be very difficult to anticipate what pests will afflict your garden, so it is a good practice to plant a diversity of plants and flowers, both perennials and annuals that provide habitat and food (pollen/nectar) for beneficial insects.

Cosmos is an excellent insectary flower attracting Ladybugs, Lacewings, and parasitic wasps which prey on Aphids, Whiteflies, caterpillars, and beetle larvae.

Cosmos is an excellent insectary flower attracting Ladybugs, Lacewings, and parasitic wasps which prey on Aphids, Whiteflies, caterpillars, and beetle larvae.

Some excellent insectary plants for the Willamette Valley include: Cosmos, Coreopsis, Phacelia, Clarkia, Baby Blue Eyes, Clovers, Calendula, Yarrow, and Buckwheat. Inquire at your local nursery about “insectary seed mixes”, special seed mixture designed with your beneficial insects in mind!

An insectary seed mix from Uprising Seeds, a local seed producer. Beautiful, beautiful seeds!

An insectary seed mix from Uprising Seeds, a local seed producer. Beautiful, beautiful seeds!

The Xerces society, based here in Portland, is an incredible local resource that is dedicated to the study, protection, and promotion of invertebrates and beneficial insects.  Check out their resource Farming for pest management”  for good ideas about thoughtful landscape design.

Also look at Renee's Garden Seeds' “Beneficial Insect Guide” for detailed info on specific predator/plant relationships.


Vegetable/Varietal Selection

A final way to curb pest problems is through careful and thoughtful selection of what you plant. Certain vegetables are especially beloved by specific pests, and so in some cases you may decide you are better off not growing certain vegetables.

This is generally an unsatisfactory answer for the most passionate gardeners. Short of cutting vegetables out of your rotations, experiment with different varieties, do your homework, read seed packets, consult with other gardeners, and inquire at a reputable nursery about pest resistance among varieties.


By using the prevention methods discussed above: rotating different plant families each season in your garden, creating habitat for beneficial insect populations, and being thoughtful in selecting the vegetables and varieties you grow, you will create an environment that is naturally resistant to the most common garden pests! The pest challenges that you do face going forward should be much easier to control since you have taken these important steps!

In my next post, I will discuss how to identify and organically control the pests that do find their way into your garden using a variety of different methods including a range of organically certified products as well as other natural and more homespun methods. Until then, enjoy the bounty and lets all encourage summer to settle in for good!

Planting and Caring for Tomatoes in the Home Garden

In part 1, I discussed the many different types and categories of tomatoes and talked about how to pick the right varieties for your garden and your needs.  This week I will talk about when and how to plant them, and how to care for them throughout the season to maximize their yield, taste, and health (and your own enjoyment!)  First lets talk about seasonal timing.


WHEN TO PLANT TOMATOES:

The short answer is: Now!

When the first rains come in September or October, it generally spells a bitter and abrupt end to tomato season with many exploded and quickly rotten fruits.  With such an uncertain end looming, and with our relatively mild Summers, it is important that we give our tomatoes every opportunity to mature.  This means making sure that they don’t get planted so late that they don’t have time to mature their fruits.  

On the other hand, tomatoes that are planted too early, when night time temperatures are consistently below 50 degrees, can suffer significantly and become stunted or diseased during a fragile time of their development.

Our Oregon Springs are about as unpredictable as our Falls, so proper timing for planting is always a bit of guess work, but I generally think of the planting window for tomatoes as being between May 1st and June 1st.  A little later or a little earlier cane work depending on the particular year, but your tomatoes may suffer for it one way or another, or you may get lucky!  So given the timing of this post, get those tomatoes in ASAP!


HOW TO PLANT TOMATOES:

When planting tomatoes it is important to think about location in your garden, spacing between plants, and planting method.

I know I’m vegetable biased, but in my opinion, the sunniest place in your garden should always be reserved for tomatoes! (and peppers, and eggplants, and zucchini, and melons, and cucumbers!).  Without full sun, you are going to struggle with any of these vegetables.  If you don’t have good garden space with full sun, grow tomatoes in 5 gallon pots.  Smaller containers have the adavantage of being portable, where they can be placed in ideal locations with reflected heat.  These containers also warm up earlier in the season and on a sunny day.

IMG_0938.JPG

Also consider how tomatoes will affect other vegetables around them.  If planting tomatoes in the ground, keep in mind that they will grow tall!  When possible, plant them on the north sides or ends of garden beds so that they will not shade out other plants as they grow.  Give at least 18” between plants when space is at a premium, and ideally allow more like 24-30”.

So you are ready to stick your tomatoes in the ground!  Your starts are watered well and the sun is shining.  The most important thing to remember when you plant is to plant DEEP.  Tomatoes have an incredible capacity to grow roots right out of their shoots (this is called “adventitious rooting”).  First remove lowest 2 or 3 lateral branches pinching or snipping (not tearing). 

Prune out lowest 2 or 3 lateral branches before planting

Prune out lowest 2 or 3 lateral branches before planting

Then bury each start all the way up to the lowest remaining branch. 

Though your tomato will look smaller to start, this will stimulate the plant to grow many more roots which will support the vigorous top growth throughout the season and will ultimately lead to healthier and more productive tomatoes!

HOW TO CARE FOR YOUR TOMATOES:

Now that your tomatoes are planted they will need some TLC in the many weeks before they offer you their treasured fruits.  In caring for tomatoes it is important to think about fertility, physical support, pruning and training, and irrigation.

Tomatoes have relatively high fertility needs.  This is partly because of the fruits they bear, and also because they take so long to mature.  For this reason, I like to fertilize my tomatoes once at the time of planting by dusting with a balanced organic fertilizer like EB Stone Organics Tomato and Vegetable Food.  A second light application when fruits begin to set can also be beneficial.

Soon enough, you will need to support your tomato plants as they outgrow their ability to stand up on their own.  There are dozens of ways to give this support, but the easiest and most widely used supports are tomato cages.  They come in many shapes and sizes, so just make sure that you purchase a cage that will last.  Simply surround your tomato with a cage and let it do the rest of the work!

Simple tomato cages

Simple tomato cages

There are many ways to prune and train tomatoes.  Different methods and approaches lead to different growth responses and tomato forms.  The truth is, you don't have to prune your tomatoes at all!  Tomatoes that go unpruned, though often unruly, will produce many and delicious fruits.  That being said, I am a proponent of light pruning early on which leads to a form which keeps later fruit off of the ground.

At the “axis” of each lateral tomato branch, small buds or “suckers” form.  These suckers grow into vegetative branches and will not bear fruit in the life of the tomato.  For this reason, I like to “thin” or pinch out suckers on the bottom 8-12” of all of my plants.  After that, I let my tomatoes run wild (within their cages).  This selective pruning of suckers involves minimal effort and leads to a tomato plant which bears its fruit on intermediate and higher branches where fruits are safe from rodents and from rotting.

Pinching out suckers

Pinching out suckers

Finally, we should all consider our approach to irrigation for tomatoes.  Tomatoes evolved in climates where irrigation was not a sure thing, and for this reason, they are remarkably resistant to water deficiency.  That is not to say, however, that they should be stressed.  During most of their life, and especially during their time of vegetative growth, they like regular deep waterings.  They suffer from having their roots saturated so provide adequate intervals between deep waterings.  

When tomatoes begin to set their fruit, their water needs change markedly.  At this time watering quantities and intervals should be reduced significantly.  Denying your tomato plants the water that they desire will encourage them to shift from their vegetative stage to their reproductive stage and will actually speed up their process of setting and maturing fruits and getting you tomatoes!

Many farmers in more arid climates "dry farm" their tomatoes, never irrigating them, and letting their deep roots tap into ground water to sustain them.

Many farmers in more arid climates "dry farm" their tomatoes, never irrigating them, and letting their deep roots tap into ground water to sustain them.

Reducing irrigation close to harvest time also reduces the moisture content in the fruits and concentrates their sugars making for much more flavorful and less mealy tomatoes.  Also, deep watering during fruiting causes sudden H20 uptake by the plants and often leads to cracking and exploding fruits.  So as counter-intuitive as it may be, take it upon yourself to be very spare with your irrigation during fruiting.


RECAP:

WHEN TO PLANT: May 1st - June 15th or when night time temperatures are consistently above 50 degrees

LOCATION: Sunniest warmest place you got! North of smaller vegetables to avoid shade effect.  Excellent grown in 5 gallon pots on patios or against south facing walls with reflective heat.

PLANTING METHOD: Deep! Snip out lower 30-40% of lateral branches and bury stem up to 1st remain branch to encourage new root growth and support future top growth.

FERTILITY: Fertilize at time of planting with balanced organic vegetable fertilizer like E.B. Stone Organics Vegetable and Tomato Food.  Fertilize again lightly at time of fruit set.

PHYSICAL SUPPORT: Support each plant with a sturdy tomato cage or other trellising system (Keeps plant from falling over and setting fruit on the ground.  maintains airflow.)

PRUNING AND TRAINING: Unnecessary but can help in establishing intended form.  My approach: Pinch out “suckers” that appear on lateral branches in first 8-12” of growth. (Keeps plant from setting fruits close to the ground where they can rot)

IRRIGATION: Water regularly during vegetative growing period.  Once fruit begins to set reduce water to light watering 1-2 times/week (Helps stimulate fruit production and maturity and concentrates sugars in fruits.)

Hopefully you now have all you need to select, plant, tend, and harvest your own tomatoes!!  Once you enjoy your own home-grown tomatoes, you will never go back to the grocery store in search of these precious fruits!  Knowing that you are growing your own tomatoes, I can now say with real conviction, Happy Summer!!!

Understanding and Choosing Tomatoes for the Home Garden

Well its already June here in Western Oregon.  We have had a handful of days pushing 90 degrees, and all signs point towards the beautiful sunny season ahead.  There are many treasures to be anticipated in our vegetable gardens in the summer months, but perhaps none hold such promise, and such delicious anticipation as home-grown tomatoes.  In fact, I know plenty of gardeners for whom the prospect of tomatoes alone could keep them gardening each year.

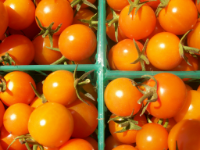
Heirloom Tomatoes at Market

Tomatoes are indeed some of the most sublime offerings from our gardens.  Their cultivation and care are a matter of much discussion, many strong opinions, and plenty of posturing (as far as gardeners could be said to posture).  And indeed, tomatoes are a unique vegetable (and fruit, yes) with plenty to teach us.  But the truth is growing your own tomatoes at home is easy and fun.  Anyone who has harvested their own ripe tomatoes on a beautiful August evening has likely had the distinctive sensation that these must be the best tomatoes in the whole world.  And in that moment they are!  This is the beauty of the beloved tomato.

So lets cast aside the high-mindedness and talk about tomatoes plainly and simply!  Everyone in this climate should have the opportunity to grow and eat their own tomatoes and if you follow a few basic steps, you should find yourself in tomato heaven come August.

There is a lot to talk about when it comes to tomatoes and so this blog will come out in two parts.  But, whatever you do, don’t get bogged down in the many details!  The most important thing is to buy some tomato starts and stick them in the ground.  As long as you keep an eye on them, you will have tomatoes!  I promise. 

In part one of The Tomato Chronicles I am going to discuss the different “types” of tomatoes that can be grown in your garden. I will talk about the difference between “determinate” and “indeterminate” varieties, “open pollinated,” “hybrid,” and “heirloom” varieties, and how to select the right tomatoes for your space and taste. In part two I will talk about the timing for planting (Now-soon!), methods of planting (location, spacing, depth)  and how to care for your plants throughout the season!

So lets dig right in...


PART ONE: UNDERSTANDING AND CHOOSING TOMATOES FOR THE HOME GARDEN

Sliced Tomatoes

CATEGORIES OF TOMATOES:

There are many ways to classify and categorize plants, and tomatoes are no exception.  Some of the ways we separate categories of tomatoes include “type” (roma/sauce, cherry, beefsteak…) “indeterminate” vs. “determinate” (ongoing fruit set vs. single fruit set) and “open pollinated” vs. “hybrid” vs. “heirloom” (Refers to history and method of cultivation/breeding).

All of these categories can be overwhelming, but a basic understanding of these differences can help us choose the right tomatoes for our needs and tastes.  And if it all feels like too much, your local nursery can generally help demystify the situation.


"Open Pollinated" vs. “Heirloom” vs. "Hybrid":

“Open pollinated” tomatoes (and other vegetables) are varieties whose seeds can be saved and planted the following year, yielding the same variety again.  These are varieties that have evolved over time, and have been selected, and improved upon by the decisions of seed savers all over the world.  If you want to save your own seeds, it is important that you plant open pollinated varieties.

“Heirloom” is a term which foodie culture has embraced with zeal.  Every consumer wants heirloom tomatoes and every restaurant touts them on their menu.  There is disagreement as to what exactly constitutes an heirloom variety but in general they are old open-pollinated varieties that were grown before world war II.   Or as Merriam-Webster’s Dictionary states “a horticultural variety that has survived for several generations usually due to the efforts of private individuals”  In general heirlooms are touted for their superior and complex flavors and equally for their fragility and perishability.  For this reason they are best eaten straight from the garden

An Interesting article about heirlooms from Burpee Seeds:  http://www.burpee.com/heirloom-seeds-and-plants/what-is-an-heirloom-article10162.html

“Hybrid” tomato varieties stand in contrast to open pollinated tomatoes.  They are generally newer varieties that have been carefully bred by selective crossing of different varieties to achieve a desired quality be it flavor, storability, disease resistance, or higher yield.  Think of a mule which is the offspring of a horse and a donkey.  Despite the favorable qualities of the mule, they are infertile and cannot breed with other mules.  They can only be created as the offspring of horse and donkey.  The same holds true for tomatoes, and unlike open-pollinated varieties the seeds of hybrids cannot be saved and replanted.  Hybrid tomatoes are always notated with “F1” following the variety name i.e. “Sungold F1”


“Determinate” vs. “Indeterminate”

“Determinate” tomatoes are varieties that grow and ripen one set of fruit, often over a 2-4 week period.  These plants tend to be more compact in size and more bush-like in form.  For this reason they require less in the way of support.  They also should be pruned less aggressively, if at all, since they have a limited potential to set fruit.  Most roma/paste tomatoes are determinate varieties as well as many standard red “slicer” varieties.

“Indeterminate” tomatoes ripen their fruits continuously and can typically produce many more fruits than their determinate counterparts.  They also tend to be more vigorous and vining in their growth requiring more support and more pruning.  Most heirloom and “cherry” varieties are indeterminate.  Their fruiting period in our climate is generally limited only by our weather, ending in the fall when precipitation and cooler temperatures compromise their fragile fruits.


“Types” of tomatoes

“Cherry:” Indeterminate plants that are generally the earliest to produce and yield many small fruits ranging in size from currant up to ping pong ball size and spanning many colors.  These are among the most reliable producers in our climate.

Sungold

"Slicer:”  Round, red, classic tomatoes can be determinate or indeterminate, often hybrids.  Great for sandwiches.  Generally heavy bearers with less complex flavor than heirlooms

slicer


“Beefsteak:” Large, meaty, juicy red tomatoes.  Often taking interesting shapes.  Generally excellent flavor.

Beefsteak

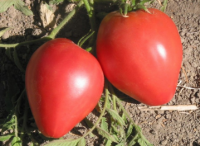
“Oxheart:” Heart-shaped fleshy tomatoes with excellent flavor.  Generally heirlooms.

Oxheart

“Roma/Paste/Plum:"  Generally compact determinate plants producing thick skinned, fruits with high flesh/pulp ratio.  Excellent for processing, and making tomato sauce.

Roma


CHOOSING THE RIGHT TOMATOES FOR YOUR GARDEN:

***Reality Check***:

We live in the Willamette Valley.  For all of its magic and mystique, and for the incredible variety of things we can grow here, we still live in a maritime climate with moderate summers and 40 inches of the annual rain we love to hate to love.  Tomatoes are still a bit of a stretch in our climate and so we need to do everything we can to make them feel at home here.  The easiest thing we can do besides making sure they get in on time and have full sun, is choose varieties that are early to mature.

*************************

Now that we have touched on the overwhelming variety of tomatoes available, its time to make some decisions!  When choosing tomatoes for your garden you should think about your growing conditions (a.k.a. amount of sunlight/heat), your intended use of tomatoes, the quantity desired, and of course your personal taste.


If you have limited sun/heat, or have never grown tomatoes before: start with cherry tomatoes!  I always plant at least one cherry tomato plant in my garden.  They are delicious, and they are the earliest to bear.  Besides, nothing is worse than watching your neighbors feast on their tomatoes while you wait the unbearable days (or weeks!) for your first ripe fruit.

If you want to grow tomatoes with superior flavor for fresh eating: choose heirloom varieties.  Heirlooms are often the slowest tomatoes to mature, so choose heirlooms with fewer days to maturity to ensure an extended harvest.

If you want to do a lot of processing/canning: choose sauce/paste tomatoes.  Keep in mind that it takes a lot of tomatoes to make tomato sauce, so if your space is limited, I recommend leaving the canning to someone else.  Fresh tomatoes are just too good to miss out on.  But if you have the space and the time, grow 5-10 plants just for sauce and you will enjoy the tastes of summer in the darkness of winter!

The best approach, in my opinion, is to grow a diversity of different tomato types and choose early to mature varieties.  This will give you the best range of experience and will also help you learn what you most like!  If I could only plant 5 tomato plants I would choose: Cherry Tomato: “Sungold F1” Plum Tomato: “Stupice” Slicer: “Celebrity F1” Heirlooms: “Ana Russian,” and “Paul Robeson”

I Will

So there you have it.  Get on down to the nursery and pick up your tomato starts, before it's too late to plant!!  You now understand different kinds of tomatoes, what to look for, and how to choose the right tomatoes for your space.  Keep an eye out for my next post, Part 2: Planting and Caring for Tomatoes in the Home Garden!!

The Pleasures of Growing From Seed... Part 2: Methods for Planting Seeds

Last week I took up the discussion of why we would want to grow vegetables from seeds instead of from nursery starts.  And as it turns out, there are tons reasons why choosing seeds can be even better than starts.  If you missed last week’s post, check out “Part 1:  Why Grow Seeds?” to get in the mood.

Beans.jpg

This week I am going to offer some clear and simple guidelines for planting your seeds that will assure their success.  Even home vegetable gardeners who know which seeds to plant, often miss some important step in the planting process and are understandably frustrated with the results.  If you follow these simple steps, your seeds will grow healthy, happy, and strong in your garden.

The THREE MOST IMPORTANT THINGS to think about when planting seeds are:  Planting depth, seed spacing, and watering method.

PLANTING DEPTH:

Each seed is a tiny little package imbued with incredible potential to become food on our tables.  But it is only with our care and nurturing that such a tiny thing can achieve such a feat!  It is the stored energy in a seed, activated by moisture and temperature, that sends the first feeble leaves upwards to seek the light of the sun.  The smaller the seed is, the less energy it has stored for that first burst of growth.  

It is because of this fragility that planting depth is such an important consideration when sowing seeds.  If a seed is planted too deep, it doesn’t have enough energy to send up its first leaves and may die before ever seeing the light of day!  On the other hand, a seed that is planted too shallowly can be displaced by watering or rain, can be eaten by birds or rodents, or may dry up with exposure and never germinate.

So it follows logically that smaller seeds should be planted more shallowly while larger seeds should be planted slightly deeper.  A good rule of thumb for planting depth is to plant seeds as deep as 3-4x their width.  For large seeds like some beans, which might measure ½” across, this could be as deep as 2", while for the tiniest of seeds like carrots, or turnips, this might mean just 1/4"-1/2" deep!!  Finding the right balance is key, and following this simple rule will help.

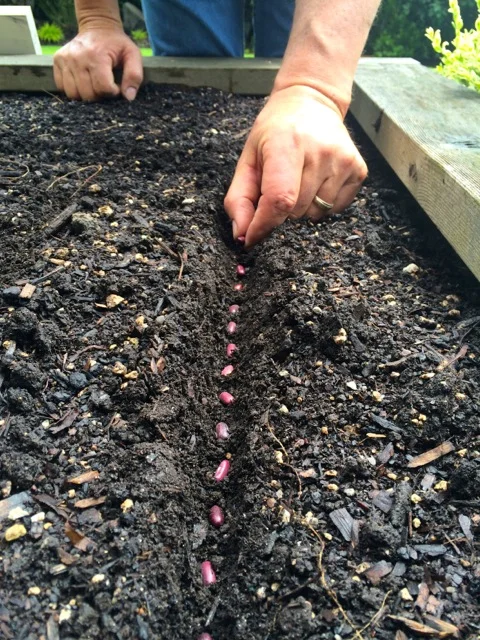
A client plants "Provider" Green Bush Beans in a 1" deep furrow with 1" spacing between seeds.

A client plants "Provider" Green Bush Beans in a 1" deep furrow with 1" spacing between seeds.

SEED SPACING:

The space between seeds is another area where even experienced gardeners often go astray.  When spacing seeds, you should first imagine the mature size of the vegetable that you are planting.  In order to maximize the use of your space, you should strive to have mature vegetables that are close together, but not so close that no individual can mature properly.  When seeds are spaced too close together, sometimes none of the seeds that are planted can grow well, and the planting may never be harvestable.  When seeds are too far apart, they have too much room to grow.  This is only a problem in that garden space is not used efficiently and yields will be lower.

The most sensitive of seeds when it come to spacing are root vegetables.  Sensitive taproots like carrots begin to swell later in their life cycle.  If they encounter physical obstacles, whether other roots or weeds during this critical life stage, they can become permanently stunted and never make carrots!

As a rule of thumb for spacing on root crops, space them at twice the density of their mature width.  For a carrot, which might have a mature diameter of 1", space seeds at 1/2".  This will account for some natural losses from seeds that don't germinate, and will also allow them to cozy up to each other and maximize your harvest.  If you sow your seeds at a higher rate than intended, just remember to "thin" them after they germinate leaving the intended spacing between each plant.  "Thinning" refers to the culling or removal of some of your germinated planting in order to accommodate future growth.

Greens like lettuce, spinach, and arugula are less sensitive to spacing considerations.  Greens that are planted at a high density (¼” spacing) can be harvested with scissors as “baby” greens, while greens at lower density (1” spacing) can be harvested when larger and more mature like head lettuce.  As long as you keep the future of your seeds in mind and plan accordingly, they will be happy in your garden with the proper spacing.

He covers the beans back to the original soil level and tamps down the soil lightly to encourage good seed to soil contact.

He covers the beans back to the original soil level and tamps down the soil lightly to encourage good seed to soil contact.

WATERING METHOD:

So your seeds are perfectly spaced at their proper depth and ready to grow.  What could possibly go wrong?  Well… A lot.

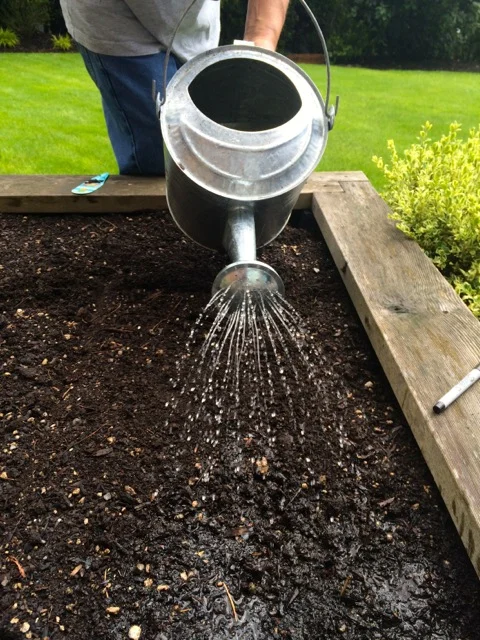
Even if you do everything right up to this point, it can all be undone in a single watering.  For watering "seedbeds," that is areas that have been sown with seed, but have not yet germinated, it is essential to use a gentle watering method. I prefer to use a watering can which can deliver a delicate and gentle shower.  A gentle hose attachment is second best, and watering straight from the hose is a big no-no!  Watering with more aggressive methods will displace the tiny seeds you have so carefully placed scattering them in all directions.  And most seeds are so small that you will not even know the destruction you have caused!

Use a gentle method taking several shallow passes over each row, allowing water to percolate evenly to the depth of your seeds, and never allowing pooling.  If it is a rainy stretch of our Oregon spring, you may not need to water more than a single time, but if weather is sunny and dry make sure you water every couple of days in cool weather, and every day in the heat of the summer to keep the soil surface moist.  This is the most delicate time in the life of your vegetables and if seeds dry out before they germinate they can die an early death.  Once your seeds have germinated and found their way to the surface, they will have slightly decreased water needs going forward, but until germination, it is very important that your seeds don't dry out!

He waters the seeds in using a gentle method careful not to displace the seeds.  This is especially important for tiny seeds!

He waters the seeds in using a gentle method careful not to displace the seeds.  This is especially important for tiny seeds!

If you follow these three principles remembering proper spacing, ideal seed depth, and appropriate watering method, your seeds will thrive!  You will find that growing things from seed opens up a whole world of possibilities for you as a home vegetable gardener.  It is an essential skill, and of course, it is a pleasure, bringing more in the way of what you want from your edible garden.

The Pleasures Of Growing From Seed... Part 1: Why Grow Seeds?

A Little Paper Cup

I still remember the experiment in kindergarten:  Planting a single bean in a paper cup filled with soil.  We lined them up on the window sill, giving them their daily watering and waited with vague anticipation for... what?  I waited, I grew impatient, I lost interest.  But I was drawn back one day to some faint stirring in the soil.  And then, those first two leaves, those pale and waxy cotyledons stretching out like fists, and then unfurling like tiny hands in happy defiance while roots stretched equally downward somewhere below.  

I loved my bean.  I reveled in its bravery and its mystery.  In some ways, I have come a long way since my paper cup, but my fascination with that little miracle has not.  And I am grateful for that.

Melon seeds germinate and push their way out...

Melon seeds germinate and push their way out...

Decisions, Decisions

As gardeners we are faced with a choice each time we go to plant something in our garden.  Should we plant seeds, or should we plant nursery starts?  It can be a confounding question, and often, it seems we choose starts.  But I would suggest that in doing so, we are missing out on something very special.  The pleasures of growing from seed are many, and so I have taken up the discussion here.  It is such a topic that I have broken it into two blog posts.  Check in next week for Part 2: Methods For Growing From Seed.

Nursery starts were, of course, grown from seeds as well.  But they have lived the beginning of their lives in the safety and care of a greenhouse somewhere.  This makes for a predictable and protective environment where they are free from many of the obstacles that a seed may face when it starts in the ground.  Furthermore, many seeds will not germinate in cold temperatures, and so starting in a greenhouse allows them to be started much earlier in the season than would be possible when planted outside.
So there are some distinctive advantages to planting nursery starts.  Nursery starts are quicker to mature from their planting date, and they have a jump on the weeds.  Both of these advantages should not be underestimated, and it seems to me that most home gardeners choose starts over seeds most of the time.  After all, when you go to your local nursery you are greeted with an abundance of starts.  It often seems easy enough to load up the car with this and that and pop them in the ground, instant garden!

The Mighty Seeds

So why would you grow a garden from seeds?  I will offer a few compelling reasons.  In short, when you grow from seed you save money, you have healthier happier plants, and you have the freedom to choose varieties that you most love and that do well in your garden!

Germinated arugula, radishes, and turnips in one of our raised beds

Germinated arugula, radishes, and turnips in one of our raised beds

Lets break that down:  You save money because seeds are much cheaper than all of the  added costs of growing starts in a greenhouse and the markups of growers, distributors, and nurseries.  Plants grown from seed tend to be healthier because they do not suffer "transplant shock," the unavoidable trauma that happens when plants change environments and when fragile root systems are disturbed during planting.  Lastly, when you buy seeds, you choose the varieties that most suit your taste, your environment, and your needs.  When growing from starts, you are subject to whatever happens to be available at your local nursery, and this can be a frustrating and disheartening experience.

So have you made your decision?  Are you for seeds or starts?  Well the truth is, the best gardens are grown from a combination of both seeds AND starts.  There are different situations, and different specific vegetables, that benefit from one or another approach.  For a list of which vegetables prefer which method, see the table at the conclusion of this blog post.

There are a handful of vegetables that should be grown from starts and shouldn't be grown from seed.  In general, these are the vegetables that take the longest to mature.  Things like Peppers, Tomatoes, and Onions, which require several summer months to reach maturity need every day they can get in our climate.  Getting them started early in the spring in a greenhouse and then planting out starts when temperatures and day length increase gives us the best chance of having a good crop in this climate.  This list also includes crops like Broccoli, Cabbage, Fennel, and Eggplant.
The greenhouse at Gaining Ground Farm in Yamhill, Oregon

The greenhouse at Gaining Ground Farm in Yamhill, Oregon

There are also some vegetables that should be grown from seed and shouldn't be grown from starts.  The most sensitive of these are root crops, especially tap-rooted vegetables like carrots, parsnips, radishes, turnips, and beets.  Tap-rooted plants have extremely sensitive root systems and can be permanently stunted when transplanted.  Other vegetables that are most happy being planted from seed include Beans, Peas, Garlic (from cloves), and Potatoes (from "seed pieces").

And then there are many vegetables that can be grown from either seeds OR starts.  This list is extensive and includes many of the leafy greens, as well as Cucumbers, Squash, Kale, Parsley, and Cilantro to name a few.  These veggies don't have the sensitivities of root crops and don't have the early seeding requirements of tomatoes and peppers.  With these vegetables I encourage people to experiment with both methods and decide what they like best!

I have never been one for dogma in my approach to gardening, and I am very wary of gardeners who suggest that there is one right way to do anything in the garden.  But using some guiding principles and experimenting with seeds can add an amazing depth and dimension to any skill set and any garden.

Here is a list of the annual vegetables that  I recommend growing in raised garden beds with suggestions for planting methods!  Happy growing...

Screen Shot 2014-04-25 at 2.26.44 PM.png

Now that you are ready to try planting from seed, make sure you check in next week for Part 2: Methods For Growing From Seed to learn about the important things to keep in mind when you are putting those seeds in the ground!


A is for Arugula!

This post kicks off Portland Edible Gardens’ blog, which aims to provide practical and reliable information, hints, and tips for home vegetable gardeners here in the Portland metropolitan area.  Climate and geography play a significant roll (one of many!) in how and when we grow what we grow in our gardens.  The information that follows comes from my own years of experience farming and gardening here in the Portland area.  With dedication, observation, and the right kind of information, we can all have vibrant and abundant edible gardens that brings a richness to our tables, our families, and our lives.  Wishing you and your gardens all the sweetest sunshine.

                            - Ian Wilson, Owner, Portland Edible Gardens, LLC

And now, on to Arugula...

I say this sort of thing a lot, but truly, Arugula is one of my very favorite vegetables to grow in my garden.  And I have my reasons.  It is easy to grow, it can be planted very early in the spring, and it can be grown both from seeds and from starts.  It is also very quick to mature, which is a big plus in the spring when we are all as eager as ever to eat from our gardens!

Arugula Germinates!

Arugula Germinates!

A salad of baby arugula leaves with thin sliced radishes is often one of the very first meals of the year I can gather from my garden.  The freshness and vague spice of young Arugula is always a welcome shift from the winter staples of root vegetables, winter squash, and hardy winter greens like Kale and Cabbage.

Arugula is in the “Brassica” or Cabbage family, along with a whole bunch of other vegetables that are very well suited to our temperate climate including Broccoli, Cauliflower, Radishes, Kale, Turnips, Choi, Collards, Mustard, Mizuna…  All of these vegetables love our cooler spring and fall seasons, and struggle with our hottest summer months.

I prefer to plant Arugula from seed, in part because I always find plant health to be best with plants that live their whole lives in one place and don’t suffer the shock of being transplanted.  Planting from seed is also considerably cheaper than planting starts.  Finally, when I plant things from seed, I get to plant my favorite varieties instead of being at the whim of what my local nursery has in stock!

Though there are dozens of wonderful arugula varieties, my favorite variety is "Astro."  It is fairly heat tolerant (as arugula goes) and has a very mild  and even sweet flavor when it is young.  It is available from Johnny's selected seeds online and can often be found at local nurseries.  

Planting from starts has the benefit of yielding earlier maturing plants, which may be helpful for the very first plantings in order to assure the earliest spring harvest.  Even so, with proper planning, you can have the arugula planted from seed rolling in right on schedule throughout the season.


Teenage arugula after a spring rain

Teenage arugula after a spring rain

When planting Arugula from seed, plant in rows with 2-3 seeds/inch at ¼”-½” depth.  When planting multiple rows, leave 6” between rows.  Mature leaves can either be harvested selectively, from the outside allowing inner leaves to mature between harvests, or all leaves can be cut with scissors.  When cutting whole plants, leave 1-2” of each plant at harvest time and plants will grow back for 2nd or even 3rd harvest!

When planting from starts, plant in rows leaving 4-6” between plants and maintain 6” between rows.  Arugula can be planted as early as March 1st or even earlier if proper frost protection is provided.  It can be planted as late as September 1st for fall harvest.

ARUGULA, PLAIN AND SIMPLE:

From Seed...

Spacing in row: 2-3 seeds/inch Planting Depth: 1/4"-1/2" Spacing Between Rows: 6" Earliest Planting Date: 3/1 Latest Planting Date: 9/1 Days to Maturity: 30-45 Harvest Window: 2-3 weeks

From Starts...

Spacing in row: 4-6" Spacing Between Rows: 6" Earliest Planting Date: 3/1 Latest Planting Date: 9/15 Days to Maturity: 20-35 Harvest Window: 2-3 weeks